
Are you looking for the best Tips to Help IPad Screen Replacement Yourself? The Apple iPad is a fantastic piece of technology that everyone enjoys. Everyone desires it in their electronic items collection, from adolescents to children. Accessories for the iPad are appropriate for both personal and business use. It’s tiny and portable, making it simple to move from one place to another. We can watch movies, read articles, surf the web, play video games, and a variety of other activities.
Due to technological or human flaws, our gadgets slow down in all functions over time. It may be anyone, but if we want to keep our iPad for a long time, we must use them wisely and carefully. Apple offers tips on how to get the most out of their devices based on how they’re used. After a period of use, a variety of issues with your iPad may arise. They are including battery draining too quickly, some Apps launching too late, storage space, and iPad screen replacements.
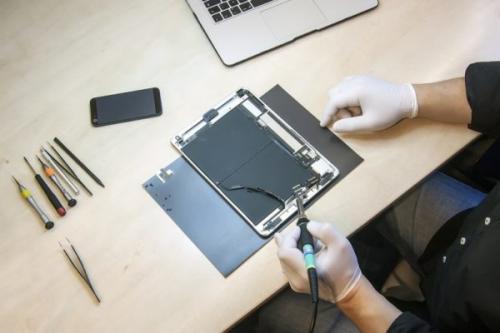
In this post, we’ll teach you how to save money by repairing your iPad yourself with the help of some of the best tool kits. A few tips and tricks can assist you in repairing and maintaining your equipment for a longer period of time.
Why do we require the Best Tips to Help iPad Screen Replacement?
1. The screen will ultimately become grainy or scratchy due to normal wear and tear. You should assess the amount of the damage little damage can be repaired quickly and cost-effectively.
2. You may easily solve these minor issues on your own. The Tool Kit will assist you in keeping iPad screens steady and performing repairs efficiently.
3. Some iPad users have reported that their device is unresponsive and that they are unable to send commands to any apps. The most common source of this issue is an app that causes your device to hang up.
4. You could wind up with a significant problem in the future if you wait too long to repair your iPad screen, and you’ll have to pay a lot of money to fix it. Throughout the troubleshooting procedure, you must remain cool and patient.
How do you replace the Screen on iPad Screen Replacement yourself?
1. Collect the Correct Parts:
The first step in repairing a broken iPad screen is to determine which parts must be replaced and which can be reused. Knowing what parts you’ll need will help you save money on your iPad screen replacement. Keep in mind that you’ll need to know your iPad’s full specifications before replacing the screen, as each series has different dimensions. In the gadget module, you may look up all of your device’s settings. The module gives you everything you need to know in a clear and concise manner, which is quite beneficial because you should know everything there is to know about something before doing it.
If you have a 3G iPad, for example, you’ll need to purchase a specific display to enable 3G.
There are two types of front assemblies for iPad screen replacement:
• A touch-screen digitizer
• Put on a show (LCD)
2. Get the Required Tools:
You should have some needed equipment on hand after purchasing the display, or you can acquire a few key items to conduct an iPad screen replacement. These tools are easy to locate and can be found on a variety of websites. To prevent creating more damage than in the previous situation, we must be cautious when employing these instruments.
There are a few Tool Kits:
• Royace Screwdriver Kit:
This is extremely useful for repairing any electronic device, including iPads, iPhones, and other electronic devices. It comprises 119 pieces set containing a complete set of small magnet pads for storing all screw and hard extenders. It aids in the completion of flexible jobs that are difficult to reach with a screwdriver, such as replacing the screen on an iPad.
• WIREHARD 6 in 1 Tool Kit:
It is utilized to reduce space while providing all of the equipment needed to repair electrical gadgets. This set contains 56 magnetic bits as well as six different tools. The entire piece is composed of heavy-duty steel and is extremely robust.
• GANGZHIBAO Electronics Repair Tool Kit:
GANGZHIBAO Repair Tool Kit comes with a 90-piece toolkit that includes all of the necessary repair tools. This kit is used to diagnose and fix all types of iPhone and iPad problems.
• SHARDEN Precision Screwdriver Set:
This is a precision screwdriver tool kit that includes 101 magnetic screwdriver bits and 1 essential tool for diagnosing and repairing all hardware issues with electrical equipment. It is also inexpensive and simple to use to separate all sections of electronic devices.
3. Separating the iPad:
Start removing the protective covering from the iPad’s display screen to prepare for an iPad screen replacement. The broken digitizer will then be placed on the front of your iPad. The metallic prying tool needs to be gripped and put into the wedge along the edge of the front panel. Maintain the wedge’s position between the metal and the panel’s black side. It may seem challenging at first, but you’ll be pleased with yourself once you’ve completed it. The troubleshooting technique necessitates caution and patience because it can be tough at times. You get the impression that you’re pressing down on a metallic tool within.
4. Heat the Broken Screen’s Edges:
This step should be done with caution. Warm the edges of your broken iPad screen using your hairdryer. Keep the drier close to the screen to remove the adhesive that is holding it in place.
5. Using a suction cup, remove the old screen:
After the screen has been heated, press the suction cup perfectly against the glass. Don’t put any additional pressure on yourself. The screen should fall off if you lift the device softly and lightly.
6. Clean and polish both the old and new iPad screens:
Using the clean cloth, buff, and polish both the old and new iPad screens to be attached. Make sure you don’t leave any fingerprints on your new screen after it’s been installed throughout the cleaning process.
7. Install the New Display:
Remove the adhesive strips from around the edge of the new iPad screen before installing it. With the help of a hairdryer, slowly warm these strips. Make sure the new screen is in the right place and correctly aligned. Press and set the edges of the iPad screen with the cleaning cloth to ensure adequate adhesion to the adhesive.
8. Final Step:
Remove the plastic protective cover screen once the new iPad screen has been properly installed. Apply extra heat to the edges of your hair with the hairdryer. Reapply the towel to the edges of the borders with care. Congratulations! Your new screen is now up and running!
Summing-up Words
We hope the suggestions and strategies listed above help you save time and money while repairing your iPad screen. If your device has been severely damaged and cannot be get repaired on your own. Visit our Esource Parts official website to arrange an appointment for the speedy repair of your iPad screen replacement. We guarantee that if you apply all of the techniques in your gadget, you will be able to use it for as long as you like.