
Making a little film for your clients to show them is the greatest option if you make jewelry. By incorporating color and shine into your artwork without making it, you may give your creations life. It is one of the most effective techniques to get customers. Customers may browse jewelry online and experience it as if they were physically there, thanks to the 3D jewelry animation services. It is one of the strongest strategies for increasing sales and profits. Here is what 3D jewelry photo rendering online is, followed by some advice.
In this piece, we’ll give a comprehensive guide on how to render jewelry considerations for those offering 3D product modeling services.
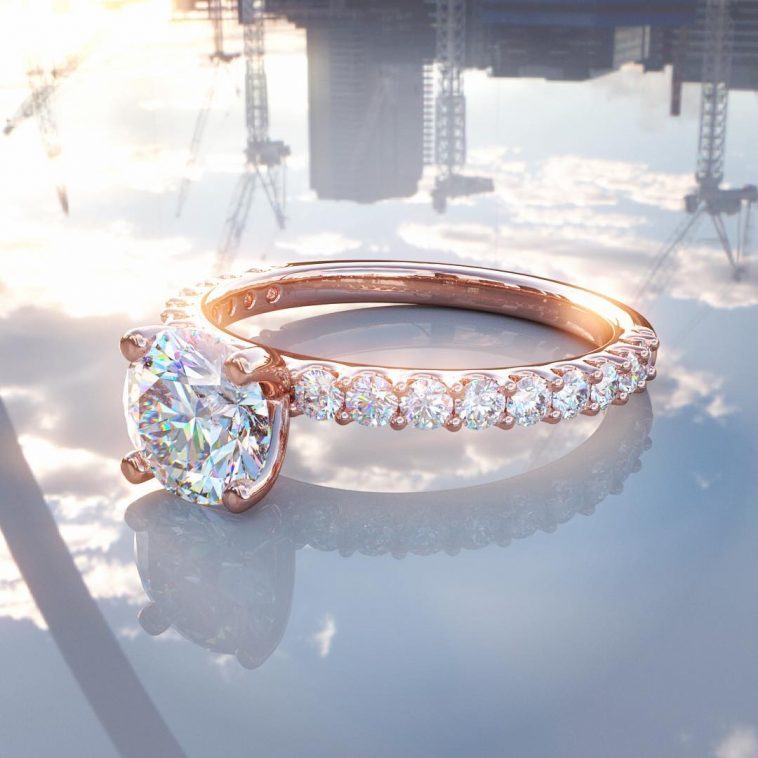
1- Embrace the Edges
Most CAD modelers don’t round the edges of the pave or halo claw settings—one of the most crucial pieces of advice to remember while providing 3D product animation services. You can apply rounds to the client’s apparent edges, such as pave, claw-set stones, etc. When the corners are somewhat rounded, it will significantly change how the final product looks and renders and seems natural.
2- Adjust the Model’s Prongs and Claws
To give the model a realistic and polished look, don’t forget to modify the prongs and claws. The stones are often set using claws, then polished by the setters. If set correctly, it produces a really attractive round appearance. Always remember that most ring views are top-down, making claws and prongs apparent to the eyes.
You should opt for a top-notch 3D jewelry rendering service with a good online rating.
3- Solidify Everything
Solid surfaces should be linked together when assembled. Expanding surfaces are the worst-looking and can interfere with rendering and rounded corners. You must present a natural appearance to appear natural. If you’re pressed for time, choose a cylinder without a cap.
Keep this advice in mind while providing 3D rendering services.
4- Make the Model Cleaner
It is the final action to do before modeling the jewelry. In this stage, you take care of every little aspect of your model and inspect each layer to ensure everything is flawless. Developers label the layers and remove everything that won’t be needed in the long run throughout the exporting process. Before the last phase, the exporters choose the components they need to transmit and review the export.
5-Render the Picture
There are several methods for rendering photos, including online product Photo Rendering Online. You should be familiar with the fundamental methods of how to render jewelry before becoming a full-on professional.
Load the image you wish to render into Photoshop. For instance, upload the image into Photoshop if you wish to erase the backdrop.
Next, you will need to obtain the lasso tool. You may find this tool in the Tools palette icon. Point the mouse to the precise outline of the image you wish to render. Press and hold the left mouse button after accurately directing the mouse to move the cursor around the picture.
One thing to remember is that although staying somewhat near the image’s shape, avoid being overly exact since this will make the rendering appear more lifelike.
Refine mask’s responsibility is to ensure that the outline pressing is not excessively precise. Also, don’t spend too much time inside an image.
Only leave the mouse if you are certain that you have traced the whole perimeter of the image. The Layer panel button, which is formed like a circle inside a rectangle, must then be clicked. The “Add Layer Mask” tool, which is equally crucial since it conceals the image’s backdrop, is available on this layered panel.
Drag the “Radius Mask” dialog box into the image while carefully inspecting it after obtaining it from the refine mask. That is done to make the red picture and background less distinct from one another. 3D Rendering Services are excellent at their work.
Drag the Refine Radius brush over a section of the gap if there is one between the red backdrop and the picture. Photoshop can help you close the space so that the red backdrop blends seamlessly with the rest of the image.
To eliminate the white border around the image, click the eye symbol next to the “Backdrop” layer to make the background transparent.
Before saving the image as a PNG, double-check the photo rendering online.
Conclusion
Due to the need, several picture-rendering firms utilize cutting-edge technology to satisfy their clients. Additionally, jewelry 3d rendering improves images for e-commerce sectors and has been demonstrated to increase office productivity by reducing the amount of labor that is unnecessary to do.
If you require professional help regarding jewelry 3d rendering, consult E-retouching India.